How do I print from a Windows PC on campus?
New! Printing has changed, please use the updated instructions below.
To print documents from computer lab Windows PCs or your personal Windows PC laptop you will need to install a network printer.
Launch File Explorer. Go to search in task bar and search "File Explorer" or select the File Explorer from the Windows System menu.
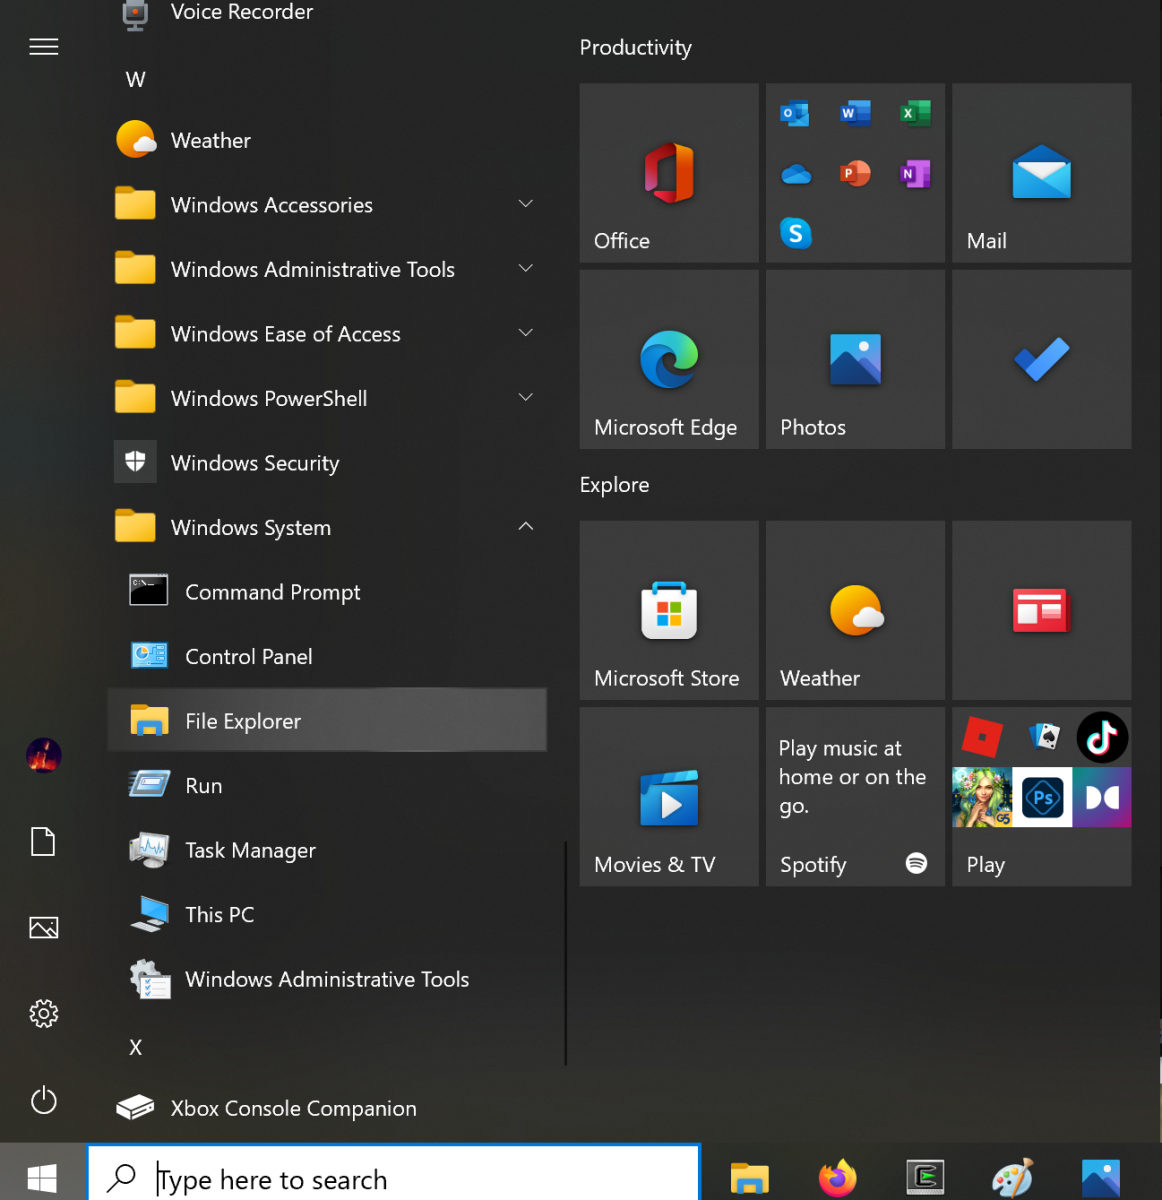
In the File Explorer address bar, type in \\its-acadprt-unl.unl.edu as shown.

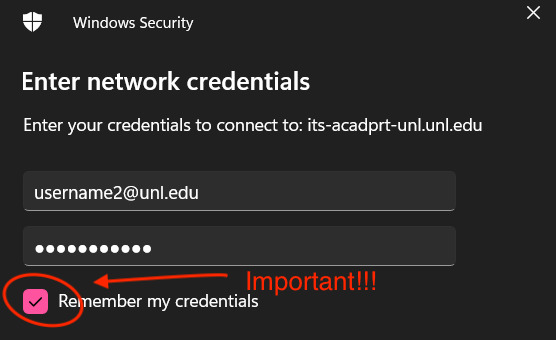
When you are asked to enter your network credentials, you will need to login with your MyUNL credentials. Your user name must be provided as MyUNL_ID@unl.edu where MyUNL_ID is your UNL login ID.
The Remember my credentials box must be checked for printing to work properly.
Once successfully authenticated, you will be presented with a list of printers. Printers are generally named by the building and room they are in. Now click on the printer you want to connect to and select connect.

NOTE: Only the below printers are available for students:
- SoC_Avery15
- SoC_Avery12
- SoC_Avery12color
Alll other SoC printer have access controls for specific users in those areas.
Common Issues
On your personal device, make sure you are connected to eduroam and eduroam must be configured as a private network.
Norton Anti-virus and certain other anti-virus vendors will prevent outgoing SMB connections. Please use the UNL provided anti-virus software CortexXDR offered thru UNL ITS.
If Windows does not prompt you for credentials, or if you cannot browse the \\its-acadprt-unl.unl.edu network, the problem lies in the Windows configuration. Verify eduroam is a private (local) network, verify your system is fully updated to the latest Windows updates and then verify that the SMB client is enabled. Here are some Instructions for how to determine if your SMB Client is enabled, and how to enable it.
There are many caveats to windows printing. If you need help please email support@cse.unl.edu. You may be asked to bring your personal device (laptop) in to the support office if your problem cannot be resolved via email.
Linux SMB Printing
The example provided depicts the GUI interface provided by the Ubuntu Linux 20.04 LTS distribution. Note: Printing only works when you connected to a University of Nebraska network.
Prior to setting up printing, you need to install some prerequisite programs. This can be done with the shell-prompt command "sudo apt install psutils python3-smbc smbclient" there will likely be a number of dependencies that also need to be installed when you issue this command.
-
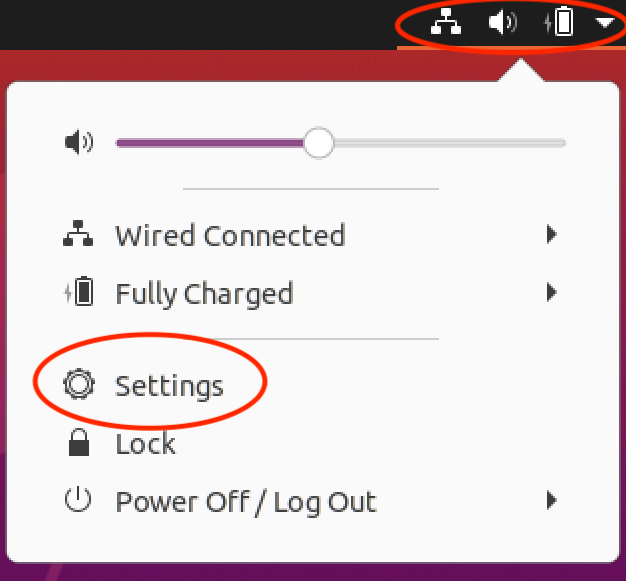
Open System Settings by clicking on the icons in the upper right corner and select "Settings".
-
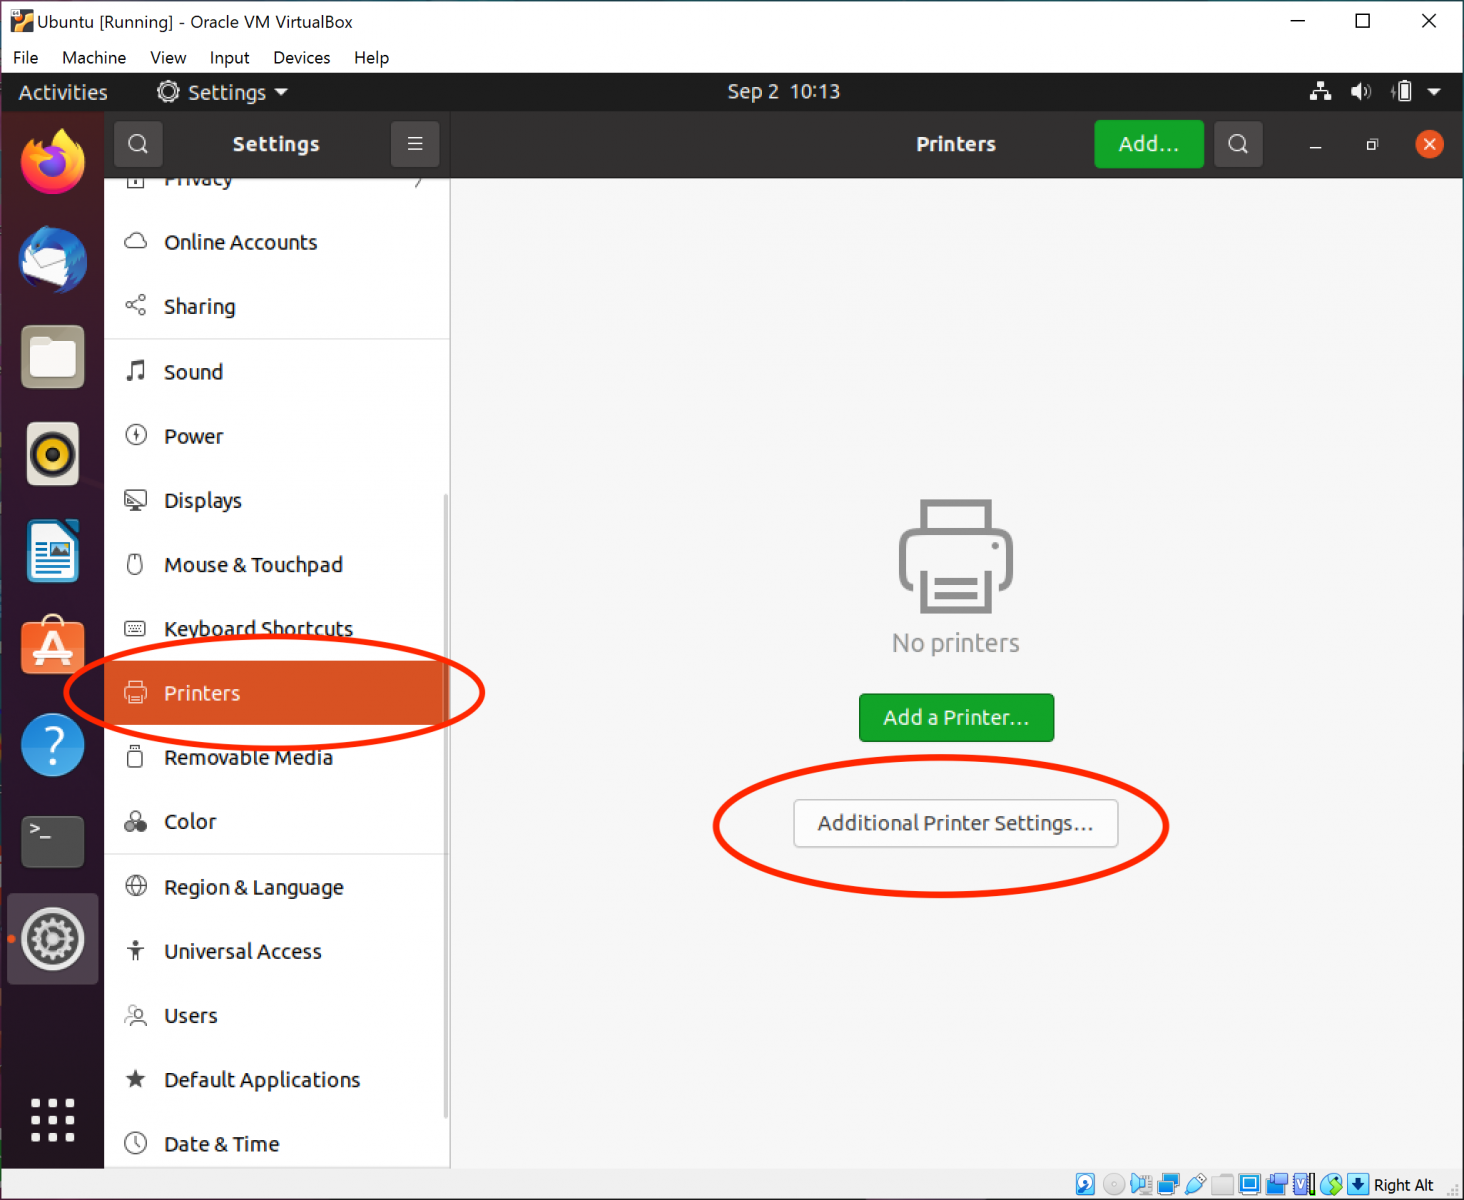
Select Printers on the left and then click "Additional Printer Settings..."
-
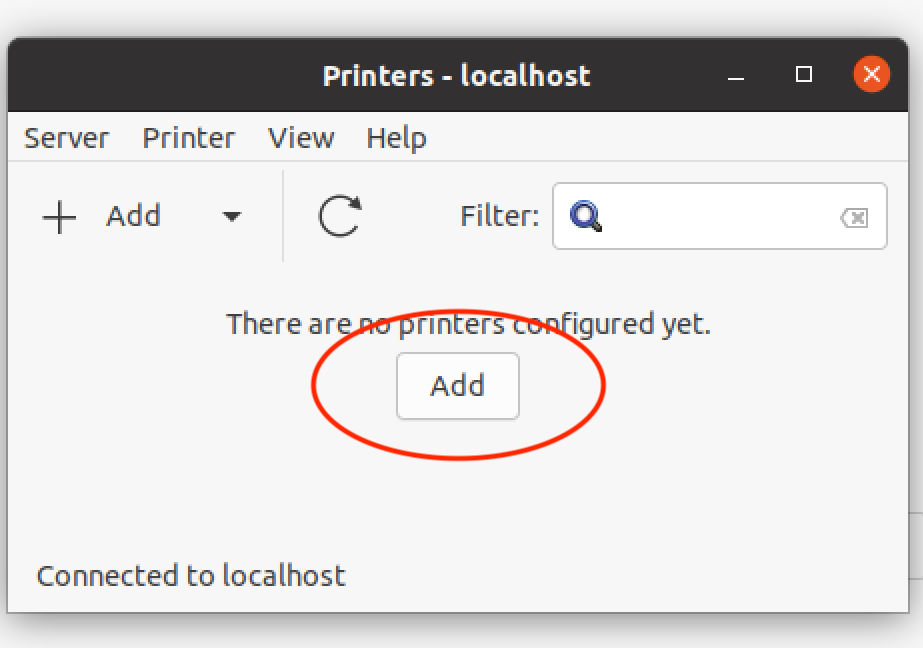
Click on Add:
-
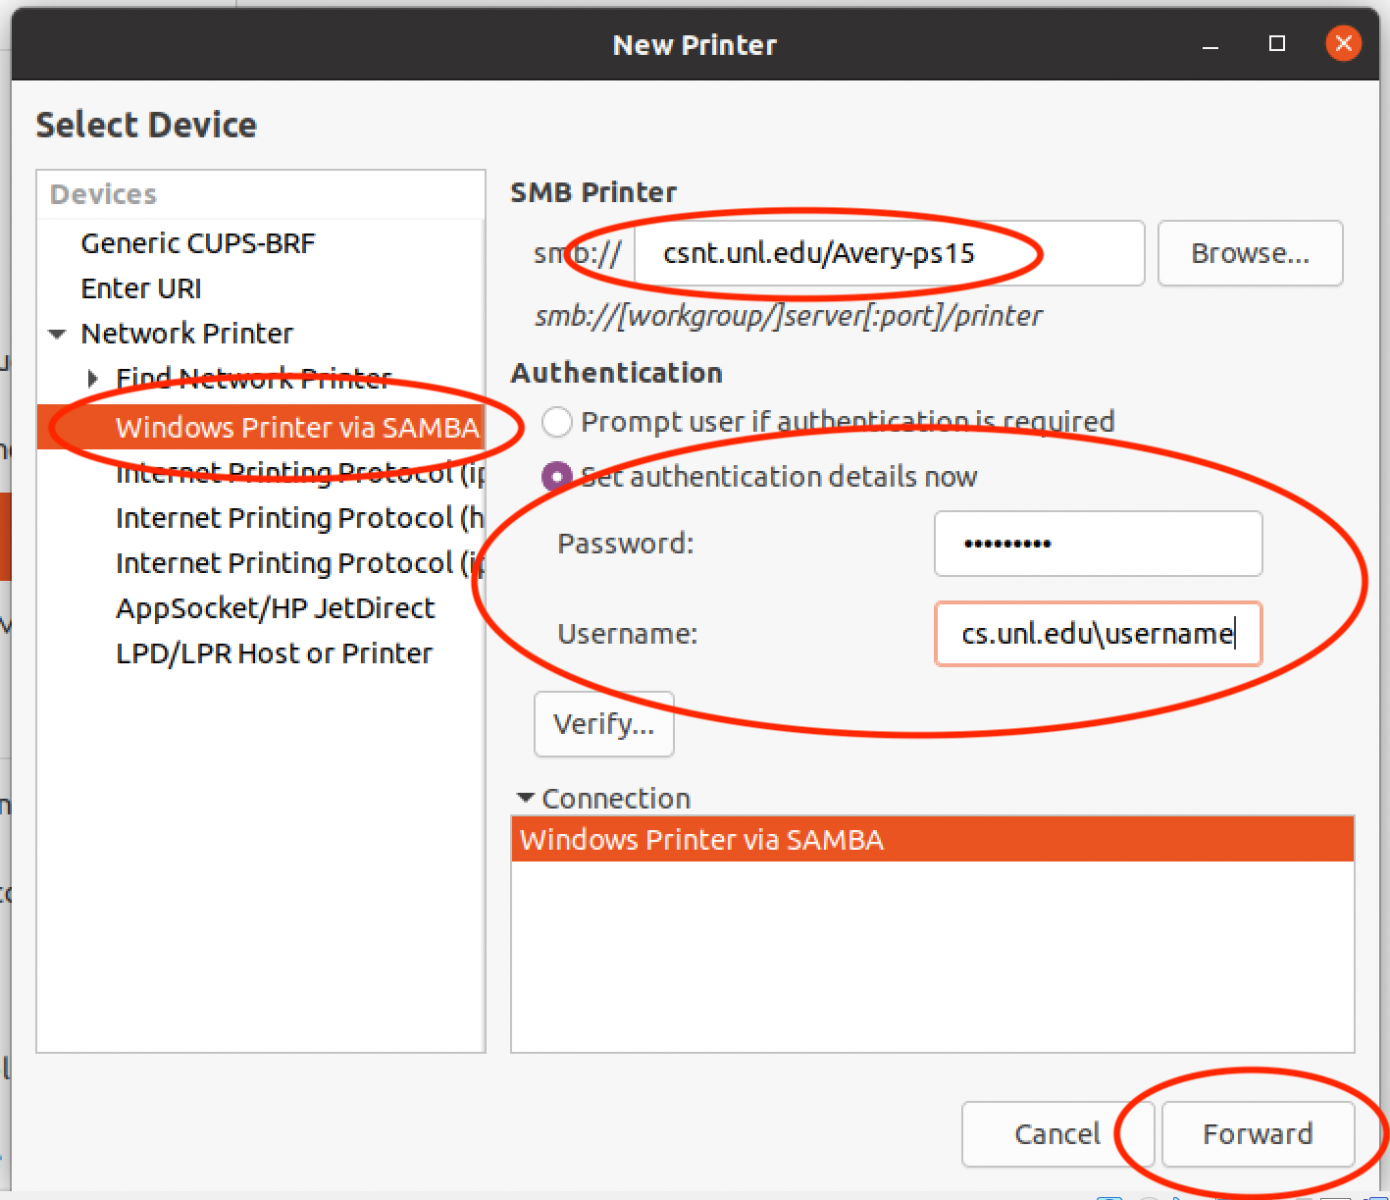
Select "Windows Printer via SAMBA" Enter csnt/ and the name of the printer that you want to add such as "Avery-ps15" and select "Set authentication details now" if the option is presented. For your login credentials, you should use your CSE login username inserting cs.unl.edu\ before your CSE username, e.g. cs.unl.edu\username. Complete the administration of the printer by entering your password and click Forward:
-
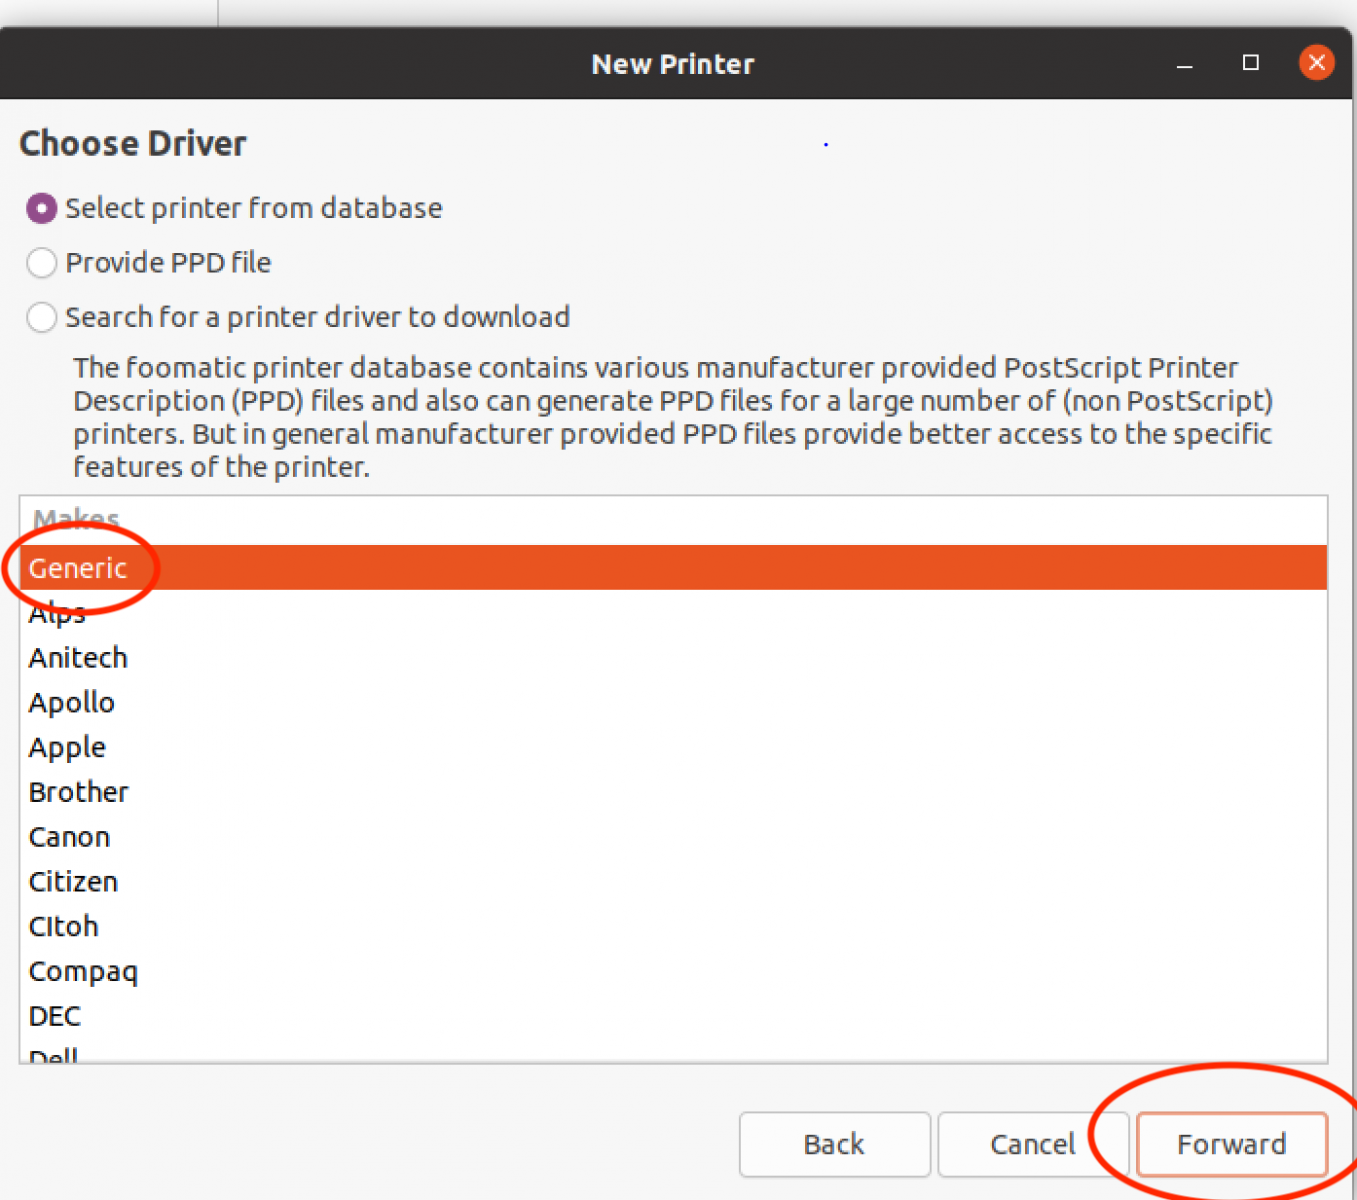
Select Generic and click Forward on the next window:
-
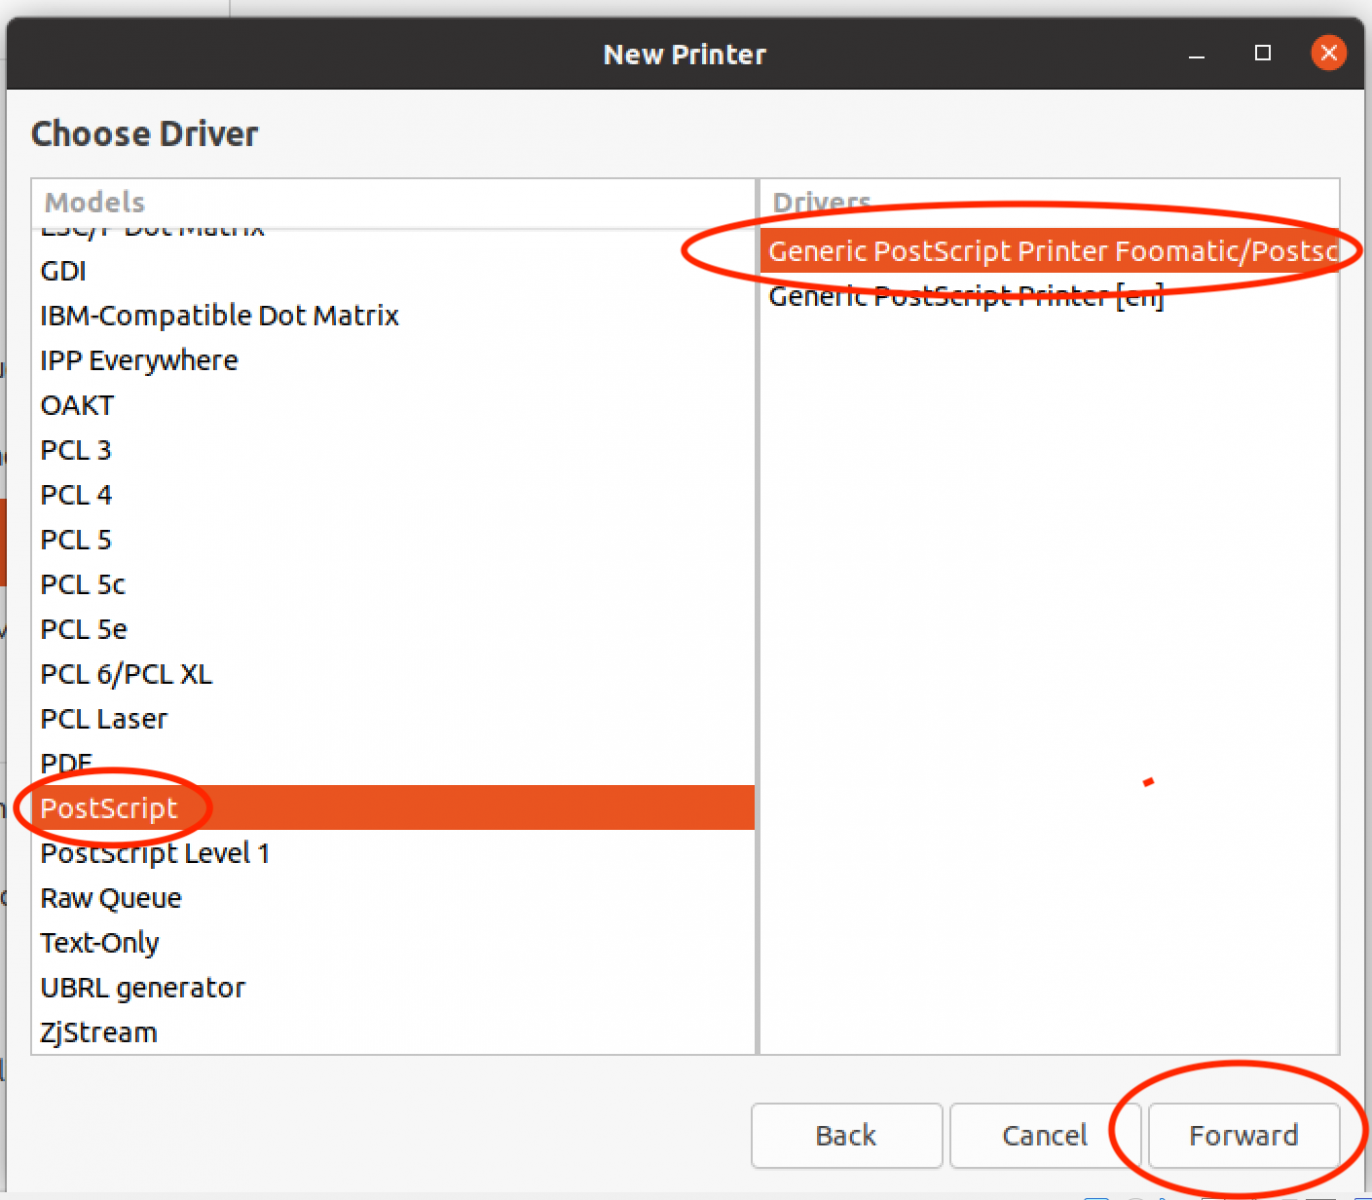
Select PostScript in the Drivers column of the next window and select Generic PostScript Printer Foomatic/Postscript [en] (Recommended) column and then click Forward:
-
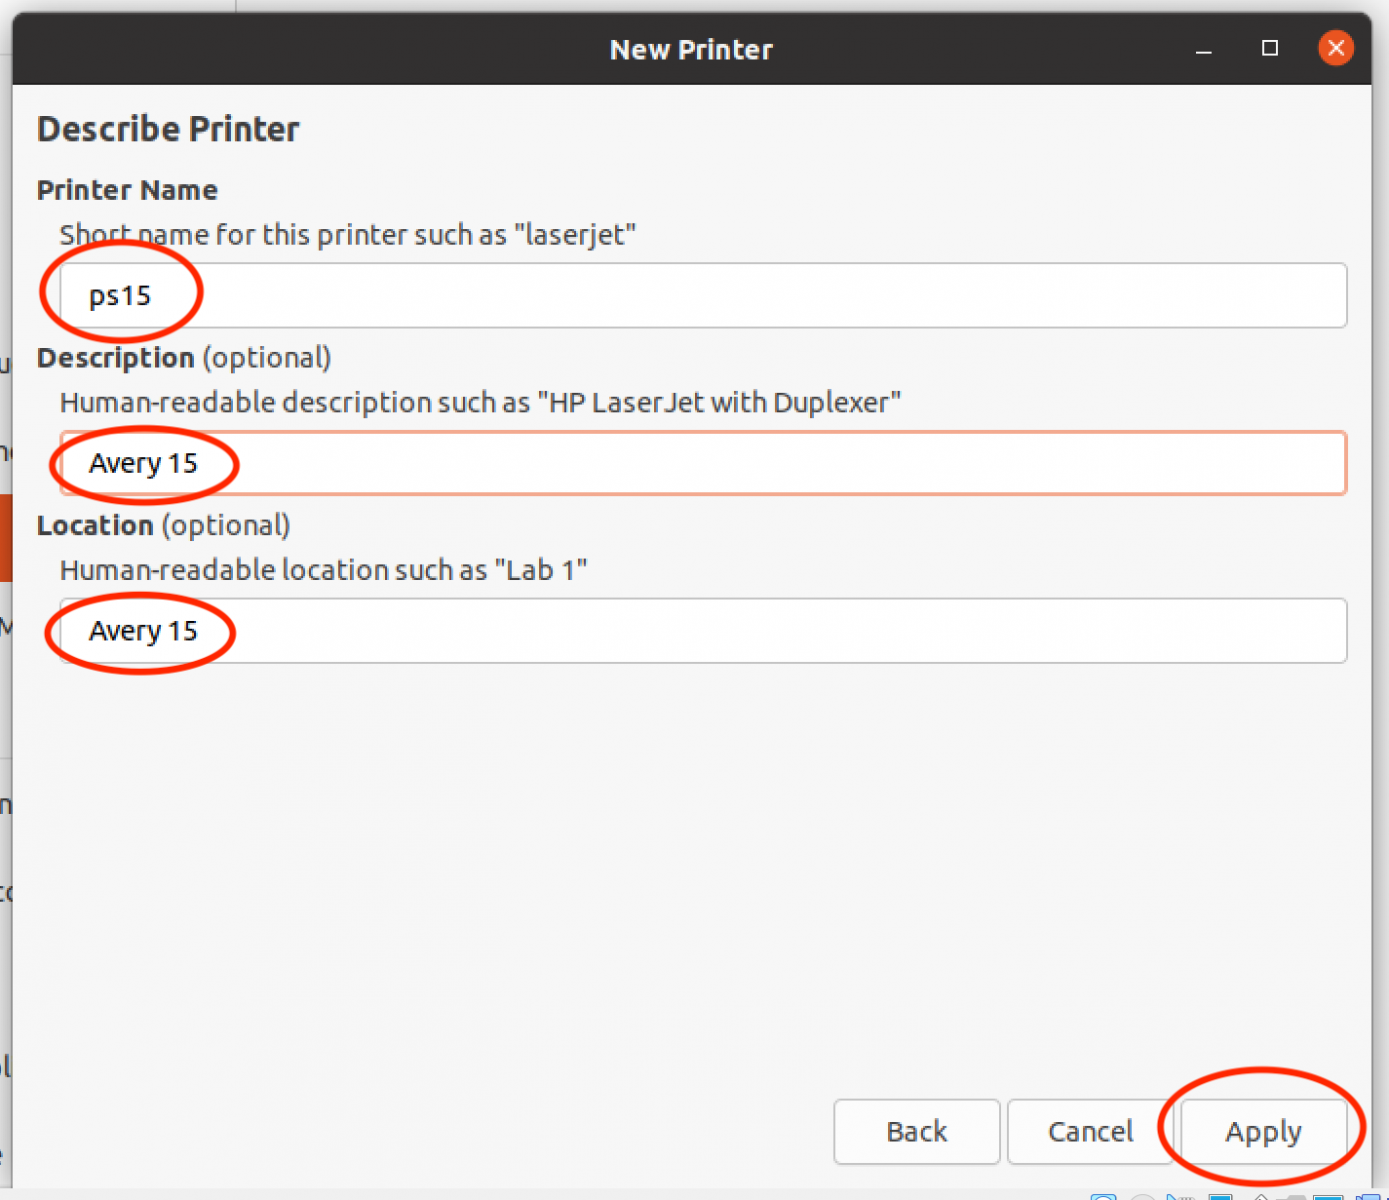
Enter a short name for the printer, such as "ps15", and a "Human-readable" name for the printer such as "Avery-ps15" and then click Apply. The short name can be used later for command-line printing and the "Human-readable" name will show up in print applications that use the system's GUI.
-
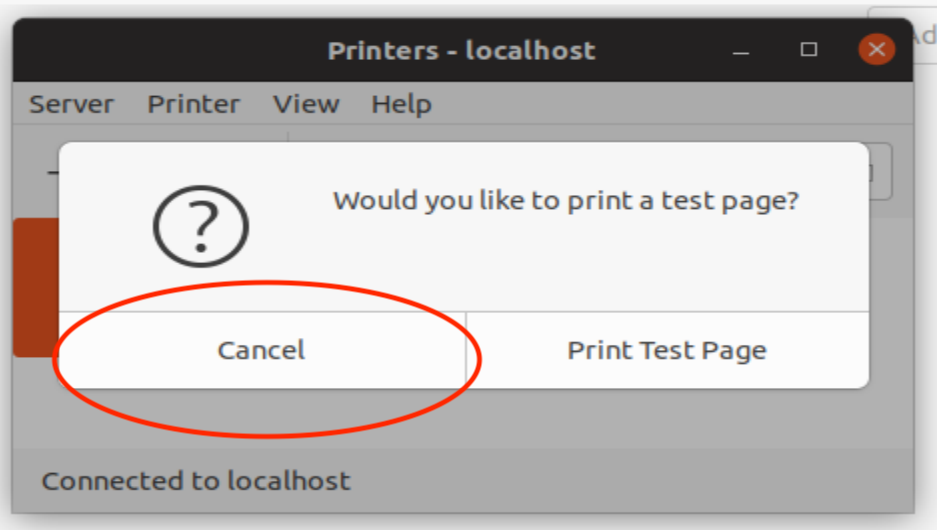
You can click Cancel on the popup window or click Print Test Page. The test page will be deducted from your print quota if you choose to print it.
-
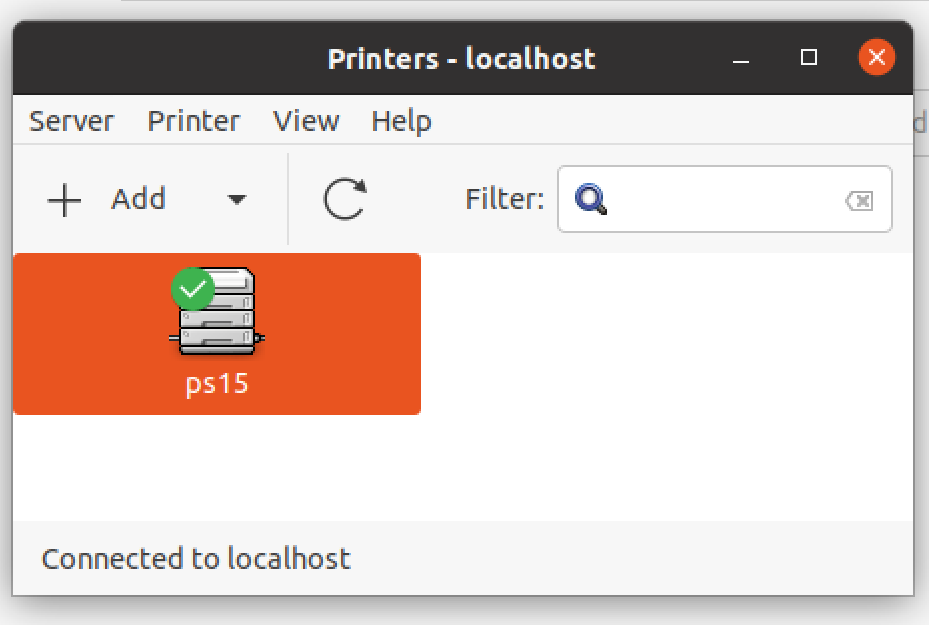
If everything worked as expected you should see the printer.
If you encounter the error: CUPS server error "client-error-not-possible" or a similar error from the CUPS subsystem, you will need to install the smbclient package, and perhaps additionally the samba or smb-common package, using the package manager provided with your Linux distribution.
Linux Mint uses very much the same procedure except instead of being called "System Settings" the system configuration application is called "Control Center". Other Linux distributions are similar.
If you want to take advantage of more advanced printer features, such as duplexing or stapling, you can use a printer-specific driver for the printer models as seen at the bottom of Printing from Mac via SMB 10.8+ section of this FAQ
Printing from Mac via SMB
Printing from University-Owned (faculty/staff) Macs
For Student or BYOD Instructions, click here.-
Install the print driver package using Launchpad to select the Self Service application:
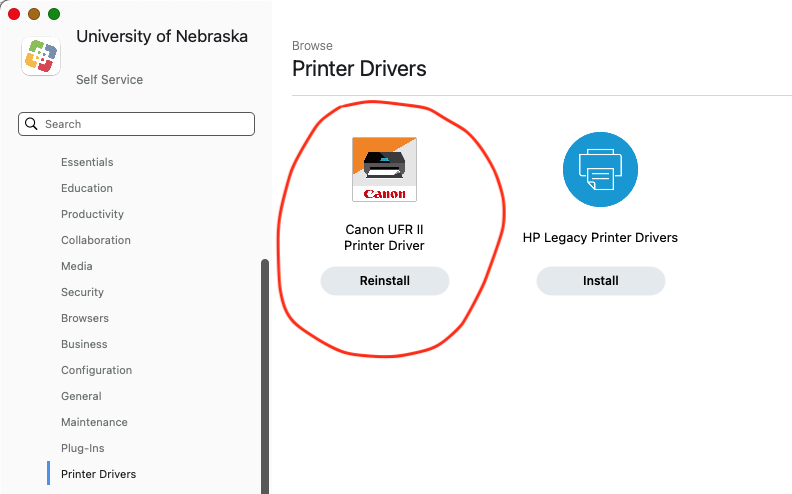
From within Self Service use the left-side menu to select Printer Drivers. Then select Install of the Canon UFR II Printer Driver package: or the HP Legacy Print Drivers depending upon the printer you are connecting to.
- Use the instructions below to add the printer using System Settings -> Printers & Scanners.
- The added printer should now be shown in the System Settings -> Printers and Scanners configuration page. You may be prompted for your MyUNL credentials the first time you print to the printer.
List of Printers
| SoC_Avery12 * | SoC_Avery12color * | SoC_Avery15 * |
|---|---|---|
| SoC_Avery104 | SoC_Avery122 |
SoC_Avery123 |
| SoC_Avery250 | SoC_Avery256 | SoC_Avery258 |
| SoC_Avery258color | SoC_Avery354 | SoC_Avery354color |
| SoC_Schorr101 | SoC_Schorr209 | SoC_Schorr209color |
Printing from a BYOD (personal) Macs using Apple Menus
Open System Preferences. Either click on the Apple Menu on the main menu bar at the top of the screen and then select System Preferences, or bring up spotlight by holding down ⌘-space and then typing System Preferences
- Then click Printers & Scanners (or Printers & Fax). Note: Your System Preferences may look different.
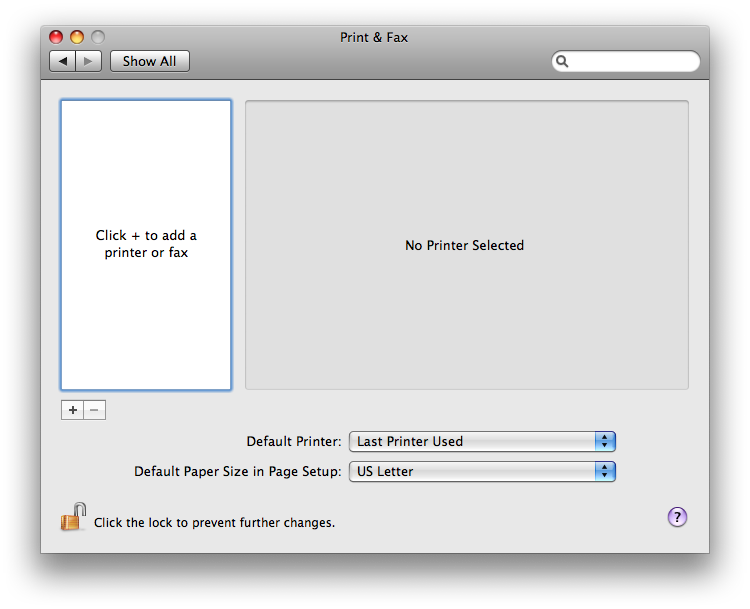 Click on the "+" button on the lower left to start the process of adding a new printer
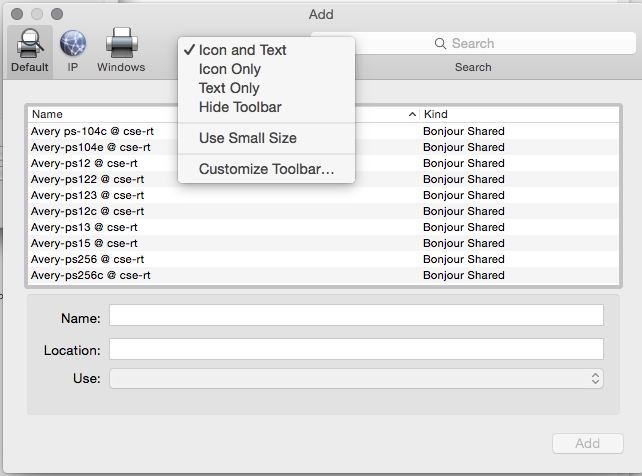 In the "Add" dialog, right click the bar at the top, and select the Customize Toolbar option. This opens a toolbar customization menu. Use the toolbar customizing menu to drag the Advanced option onto the menu bar. You may skip this step if you already have the Advanced options symbol on the Add dialog toolbar.
 The printer Type is "Windows printer via spoolss". In the URL, type in smb://its-acadprt-unl.unl.edu/PRINTER. Replace PRINTER with one of the printer names shown above. For example, if you wanted to print to the printer in Avery 12, you'd use SoC_Avery12. See all the printers in the list above. In the dialog box, for Printer Name, replace
its-acadprt-unlwith something that better identifies the printer. Finally for the Print Using option, select either generic postscript or the appropriate driver from the list if you have installed drivers from Self Service or the manufacturers support website.-
Click add. Your printer should now be added. Print a test page to make sure everything works.
-
When you print to this printer for the first time, you will be prompted for your login and password. Use your UNL MyRed login. Check the "Remember this password in my keychain" checkbox as shown.
If you change your UNL MyRed password, you will need to launch the keychain utility and delete the stored old password for this printer. The keychain record, will be found in the "Login" keychain, in the "Passwords" category and will be named the same as the printer name, simply select this record and delete this entry. The next time you print you will be prompted for the new password which must be entered as described above.
How many pages am I allowed to print each semester?
Printer quotas are assigned by the number of School of Computing classes (CSCE/SOFT/RAIK) you are enrolled for each semester. For each class you enroll in, you get $12.00 worth of printing or 200 pages of B&W printing at $0.06 per page.
In addition, if you are enrolled for thesis or dissertation hours, you will receive an additional $20.00 added to their printer quota each semester.
Purchasing Additional Print Quota
- Students can purchase additional pages in 100 page increments for $6.00.
- Pages can be purchased at Room 27 Avery Hall.
- Purchased quota does not expire at the end of the semester.
How to I check my printer quota and balances?
Your remaining printer quota along with the printers you have access to, is displayed on the main page of the School of Computing (SoC) Account Management Utility (AMU) page at https://cse.unl.edu/account.
Additional printer quota can be purchased from the system administration offices in Avery 27C. The current cost is $6.00 per 100 pages. The cost is charged to your NCard charge account, so you will need to present your NCard at time of purchase.
Duplex Printing and Stapling on Canon IR Printers
Instructions to duplex and staple on Canon IR printers- Go into system preferences, click on Printers and Scanners and then select the desired printer on the popup dialog
- Confirm that a Canon IR driver is installed for the printer (See 1 on image below)
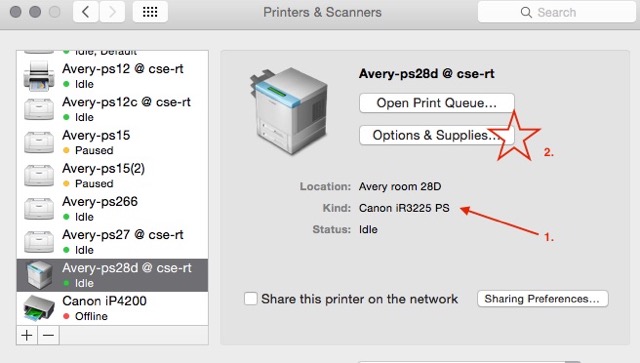
- If the Canon IR driver is installed, click on the Options and supplies (see 2 on image above)
- Then click on the options tab(see 3 on imag eblow) on the pop up dialog
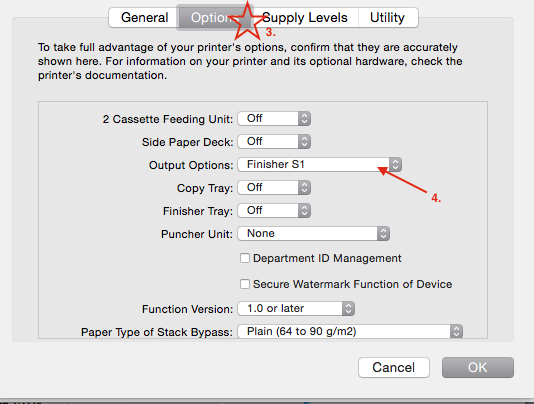
- Make sure the “Finisher S1” is selected under output options (see 4 on image above)
- Then when you go to print, you’ll need to select “Finishing” from the advanced options pull down( see 5 on image below)
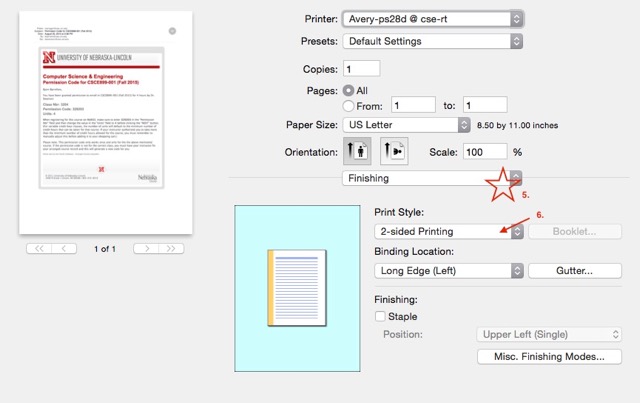
- Finally select 2-sided printing (see 6 on image above) and check the Staple checkbox below that to staple the job.
